
How to Improve Your Golf Swing With Better Posture
Quick Summary
Better posture improves your golf swing by setting the club on the correct path before you swing. Build a sound setup by hinging from the hips, keeping a neutral spine, and softening your knees while your weight stays balanced over the middle of your feet. Film your address from face-on and down-the-line angles to check your golf posture.
- Hinge from the hips and keep your lower back flat or slightly arched rather than rounding it.
- Keep your knees soft, not locked, so your hips can turn freely.
- Film your setup from face-on and down-the-line angles to check spine angle and weight location.
- Aim for a spine angle of roughly 30 to 40 degrees for a mid-iron.
- Practice one posture fix for two weeks before adding another.
Table of Contents
- Why Golf Posture Controls Your Swing
- Building a Sound Golf Setup Posture at Address
- Adjusting Your Posture for Your Body, Mobility and Clubs
- Golf Posture Drills You Can Practice at Home
- Golf Posture Stretches to Improve Mobility
- Common Golf Posture Mistakes and Their Ball-Flight Symptoms
- Booking a Posture Check and Starting Your Practice Plan
- Frequently Asked Questions
Why Golf Posture Controls Your Swing
Your posture at address strongly influences where the club goes before you swing it. Many golfers blame their timing or grip when the real problem starts in the setup.
Think of posture as the foundation for everything else. Rotation, balance, and contact all depend on it.
Desk work makes this harder. Many golfers spend hours hunched over a keyboard, which can shorten the chest muscles and round the upper back.
Building a Sound Golf Setup Posture at Address
A good address position is built in a few simple steps. Start by standing with feet about shoulder-width apart for most irons. Hold the club in front of you, then hinge forward from the hips until the club hangs toward the ground.
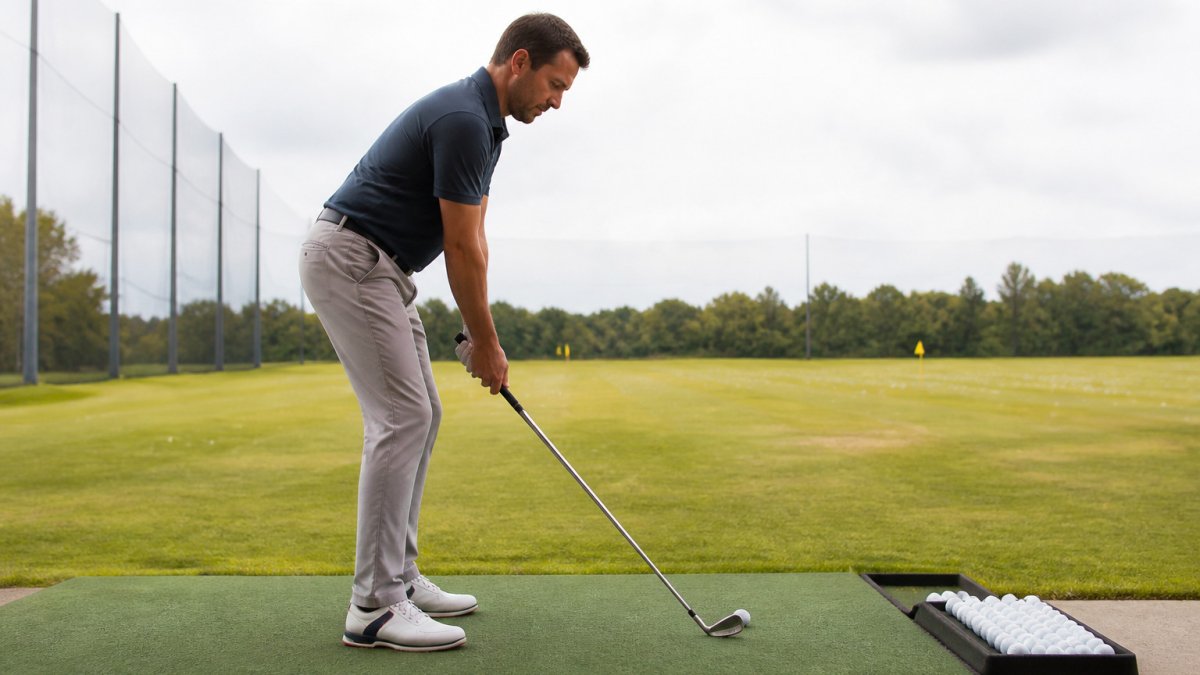
Keep your weight balanced between the balls and heels of your feet. Let your arms hang naturally from the shoulders. Avoid reaching for the ball, since that pulls you off balance and forces compensation.
Hinging From the Hips and Keeping a Neutral Spine
The hip hinge is the most important movement in the setup. Push your hips back as if you are sitting on a tall stool. Keep your chest up and your lower back flat or slightly arched.
A common mistake is rounding the back to reach the ball. That rounding looks small but changes your swing arc. Check your spine angle in a mirror or on video from a side view.
Knee Flex, Balance and Foot Placement
Soft knees give you an athletic stance. Bend them slightly, enough to feel your weight in the middle of your feet. Locked knees restrict your hips and make it harder to turn.
Balance comes from even weight distribution across both feet. Lean too far onto your toes or heels and your swing will drift. Place your feet so the ball sits roughly in line with your front foot for most full swings.
Adjusting Your Posture for Your Body, Mobility and Clubs
Your ideal posture depends on your body. A tall golfer will hinge less than a shorter golfer to reach the same ball position. Someone with limited hip mobility may need a wider stance and a slightly more upright spine angle.
Adjust for your injuries too. If you want to compare dedicated posture trainers built for golf performance, review those options before changing your setup.
Club length also matters. Driver setups usually have a wider stance and more upright posture than wedge setups. Shorter clubs bring the hands closer to the body, so the hip hinge becomes deeper. Here is a quick guide:
| Club Type | Stance Width | Spine Angle | Ball Position |
|---|---|---|---|
| Driver | Wide, near shoulder width or more | Slightly more upright | Forward, near front foot |
| Mid-iron | Shoulder width | Moderate hinge | Center of stance |
| Wedge | Narrower | Deeper hinge | Slightly back |
Golf Posture Drills You Can Practice at Home
Practice does not need a driving range. You can build a repeatable posture habit in your living room with a few simple tools and a clear progression. The goal is to make a good setup feel automatic, then prove it holds under swing speed.
Set Up a Feedback Station
Before you drill, set up a way to check yourself. You need two things: a phone camera and a full-length mirror.
- Face-on view: Place the phone at hip height, about 10 feet directly in front of you. This shows stance width, weight distribution, and whether your head moves off the ball.
- Down-the-line view: Place the phone behind you, aligned with your target line, at hip height. This shows spine angle, hip hinge, and early extension.
Film 10 seconds of your setup and 10 seconds of a slow-motion swing from each angle. Save the clips in a folder labeled with the date so you can compare week to week.
Checkpoints to Look For on Video
Use these observable checkpoints instead of guessing:
- Spine angle at address: Draw an imaginary line from your tailbone to the base of your neck. It should tilt forward roughly 30 to 40 degrees for a mid-iron. If it is closer to vertical, you are standing too upright.
- Hip hinge vs. back round: Your belt line should move backward as your chest moves forward. If your lower back flattens or rounds, you are bending from the waist, not hinging.
- Knee flex: Knees should be soft, not locked. You should be able to wiggle them slightly without losing balance.
A Progressive 4-Week Drill Plan
Do this routine for 10 minutes, three times per week. Each week adds one layer so you are not changing everything at once. (Source: biomechanics of a golf swing)
Week 1, Build the feel.
- Stand in your setup with a club held across your lower back. The club should touch your tailbone, mid-back, and the back of your head.
- Hinge from the hips until you feel all three contact points. Hold for 20 seconds while breathing steadily.
- Stand up, reset, and repeat five times.
Week 2, Add movement.
- Repeat the Week 1 drill, then make slow half-swings while keeping the club against your back.
- Focus on keeping your spine angle constant from address to waist-high. Do 10 slow reps.
- Review your clips and note one checkpoint that drifted.
Week 3, Add speed.
- Do the wall drill: stand with your backside lightly touching a wall, hinge into your setup, and make slow swings without your hips pushing into the wall. This teaches you to keep your posture without early extension.
- Do 10 reps at 50 percent speed, then 5 at 75 percent.
- Compare your impact frame to your address frame in the down-the-line clip.
Week 4, Test retention.
- Hit 20 balls on the range or into a net, filming the last 10 from down the line.
- Count how many swings keep your spine angle within a few degrees at impact. Your goal is 8 out of 10.
- If you fall short, repeat Week 3 before moving on.
Tools That Help
A mirror and phone are enough to start. If you want physical feedback, a posture training aid like the PosturePlank FLEX can help you feel the muscles that hold your spine, hips, and shoulders stable through the swing. You can find it at PosturePlank FLEX for $119.00. Use it as a supplement to video feedback, not a replacement, the camera tells you what actually happened.

Golf Posture Stretches to Improve Mobility
Good posture needs good mobility. Tight hips, stiff thoracic spines, and short hamstrings all limit how far you can hinge and turn. A few targeted stretches can make a big difference over several weeks.
Focus on these areas:
- Hip flexor stretch: Kneel with one knee down and lean forward gently for 30 seconds per side.
- Thoracic rotation: Sit or kneel and rotate your upper back slowly to each side.
- Hamstring stretch: Keep your back straight and reach toward your toes without rounding.
If you struggle with rounded shoulders, a step-by-step routine can help. Read Exercises for Rounded Shoulders: A Step-by-Step Routine to build a plan that works for you.
Common Golf Posture Mistakes and Their Ball-Flight Symptoms
Posture mistakes show up in your ball flight. Recognizing the pattern helps you fix the cause instead of chasing the symptom. The table below connects each fault to what you will see on video, the ball-flight symptom it tends to produce, and the first correction to try.
| Fault | What You See on Video | Typical Ball Flight | First Correction |
|---|---|---|---|
| Standing too upright | Spine angle near vertical at address; little hip hinge | Thin or topped shots; loss of power | Push hips back until the club hangs toward the ground; check spine tilt is 30-40 degrees for a mid-iron |
| Rounding the back at address | Lower back flattens or curves; chest drops toward the ball | Fat shots; inconsistent contact | Hinge from the hips, not the waist; keep chest up and lower back flat or slightly arched |
| Locked knees | Knees straight; hips cannot rotate freely | Blocked or weak shots; reduced turn | Add soft knee flex until you can wiggle them without losing balance |
| Early extension (standing up through impact) | Hips move toward the ball; chest lifts; spine angle changes from address to impact | Thin shots, heel strikes, and a loss of posture | Wall drill: keep your backside lightly touching a wall through slow swings |
| Leaning too far back | Weight on heels; spine tilts away from target at address | Slices or pulled shots | Move weight to the middle of each foot; check by lifting your toes |
| Reaching for the ball | Arms extended too far from shoulders; balance shifts to toes | Toe strikes; loss of balance | Let arms hang naturally; stand closer so the club reaches the ball without reaching |
How to Diagnose Your Fault
Use a two-step process instead of guessing:
- Match the symptom. Start with the ball flight. A thin shot points to standing up or early extension. A fat shot points to rounding the back or dropping the chest. A slice points to leaning back or an open setup.
- Confirm on video. Film down-the-line and face-on clips. Pause at address and at impact. Compare spine angle, hip position, and weight location. The fault that appears consistently is the one to fix first.
Fix One Fault at a Time
Changing posture is a motor-skill change, and most golfers can only manage one at a time. Pick the fault that shows up most often on video, apply the first correction, and practice it for two weeks before adding another. If you change three things at once, you will not know which one worked.
If rounded shoulders from desk work are part of the picture, read How to Fix Rounded Shoulders From Desk Work for practical ways to ease that tension.
Booking a Posture Check and Starting Your Practice Plan
Start with one small change and practice it for two weeks before adding another. Film your setup once a week, note your progress, and keep your drills consistent.
If pain, stiffness, or a past injury limits your movement, talk with a qualified health professional before you change your posture.
Consistency matters more than intensity. Keep your sessions short, keep your form clean, and build from there.
Frequently Asked Questions
How does posture affect your golf swing?
Posture sets the starting geometry of your swing. A proper hip hinge and spine angle let your shoulders turn around a stable axis, which supports a fuller backswing and a more repeatable path into the ball. When posture drifts during the swing, most golfers lose either their turn or their balance, and contact tends to vary from shot to shot. Checking your setup in a mirror or on video can help you see whether posture is contributing.
What is the correct posture for a golf swing?
At address, stand with feet about shoulder-width apart, hinge forward from the hips until your arms hang naturally, and keep your lower back flat rather than rounded. Your knees should be softly flexed, weight balanced evenly between the balls and heels of your feet, and your spine tilted forward from the pelvis. The posture should feel athletic and stable, not stiff, and you should be able to maintain it through the entire swing.
Can poor posture cause inconsistent golf shots?
Yes. A setup that is too upright, too bent over, or leaning off the ball changes where the clubface meets the ball. Slouching at address often shifts your weight back and makes it harder to rotate, while losing spine angle during the downswing commonly leads to thin or fat contact. Because these faults vary with fatigue and setup habits, they show up as inconsistency rather than one repeated miss.
What stretches can help improve posture for golf?
Hip flexor, thoracic spine rotation, and hamstring stretches are useful starting points because they improve the range of motion needed to hinge and turn. If you have a back condition, pain, or limited mobility, talk with a qualified healthcare professional before starting a new routine.
